Deep Cleaning Tile and Grout: A Practical Step-by-Step Guide
Master deep cleaning tile and grout with this practical, step-by-step guide by Grout Maintenance. Learn safe methods, tools, and maintenance to keep surfaces looking fresh and stain-free.

What deep cleaning tile and grout achieves
Deep cleaning tile and grout removes embedded dirt, bacteria, and mineral stains that regular spot cleaning cannot touch. It restores color, extends grout life, and makes tile surfaces look almost new. According to Grout Maintenance, a methodical, repeated approach yields the best long-term results, especially in high-traffic areas like kitchens and bathrooms. This is not just about aesthetics—clean grout resists mold and keeps tiles healthier for your family. In this section you’ll learn why a deep clean matters and how it fits into your overall tile-care plan, including timing, frequency, and the tools that make the job efficient.
Key takeaway: Deep cleaning targets built-up grime where cleaners and everyday mopping miss it, delivering a noticeably brighter result. Grout Maintenance’s experience indicates that consistency beats marathon cleanings.
Understanding grout variants and limitations
Grout comes in several formulations, each with different cleaning tolerances and sealing needs. Cementitious grout (the most common) is porous and stains easily, while epoxy grout is denser and more resistant to water and chemicals but can be trickier to repair if damaged. Sealing grout after a deep clean helps block future staining, especially in showers or contact-heavy areas. Before you begin, identify your grout type so you select the safest cleaners and the right brushing pressure. Grout Maintenance emphasizes testing cleaners on a small, inconspicuous area first to avoid color changes or texture damage.
Important tip: If you’re unsure about your grout type, consult your tile installer or refer to the manufacturer’s care guide. A quick test spot can save you from costly mistakes.
Safety and prep for deep cleaning
Safety comes first when tackling grout that’s discolored or mildewed. Ventilate the area well, wear gloves, and protect adjacent surfaces from splashes. Remove nearby textiles and rugs, and cover dry spots that could absorb cleaner. Read cleaner labels to confirm compatibility with your tile and grout. Never mix cleaners, especially chlorine bleach with ammonia or acidic products. These combinations release dangerous fumes and can damage grout.
Preparation also means planning the workflow: work in small sections, so cleaner doesn’t dry on the surface before you scrub. Grout Maintenance recommends outlining the area (e.g., a 2-by-3-foot section) and keeping cleanup supplies within reach.
Cleaning vs. sealing and regrouting
Deep cleaning is the first step in a longer grout-care cycle. After cleaning, you can choose to seal the grout for added protection or regrout if the cementitious material is badly cracked or crumbling. Cleaning restores the surface, while sealing locks in that result and makes future cleanups easier. Regrouting is more invasive and typically required when tile edges are loose or grout is deeply damaged. Grout Maintenance suggests weighing the cost and effort: a thorough clean plus sealing often yields a comparable outcome to regrouting for many homes.
Note: Sealing is not a substitute for regular cleaning; it’s a maintenance layer that slows staining and moisture ingress.
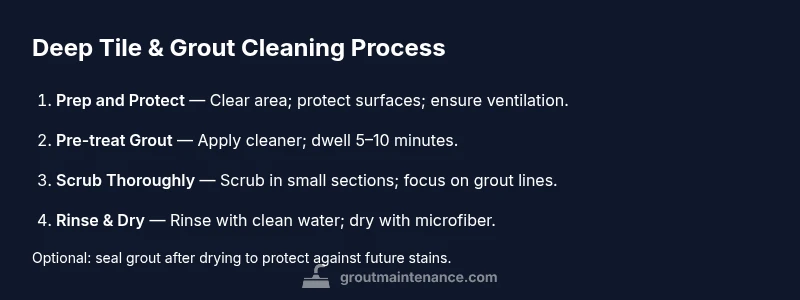
Deep cleaning methods in detail
There isn’t a one-size-fits-all method for all tiles. For most cementitious grout, a combination of cleaner, water, and a stiff-bristled grout brush delivers reliable results. For tougher stains, oxygen bleach or a neutral pH cleaner can help, while avoiding acidic agents that can damage natural stone or colored grout. Steam cleaning is an option for some surfaces, but test first—high heat or moisture can loosen grout in some installations. In areas with heavy mildew, a biodegradable, mold-safe cleaner paired with time to dwell (not to dry) can yield better stain removal.
In this section we walk through a practical, safe approach you can apply in most kitchens and bathrooms. The goal is not just whitening grout, but restoring the even tone of the entire tiled surface so that grout lines read as a cohesive unit. Grout Maintenance notes that regular, mindful cleaning yields longer-lasting results and reduces the need for aggressive chemical cleans later.
Examples of dwell times: For light soils, a 5–10 minute dwell is often enough; for heavy stains, you may extend dwell to 15–20 minutes with periodic reapplication. Always rinse well after dwell periods to prevent residue.
Maintenance and prevention after deep cleaning
Once grout is clean, prevention becomes the easiest part of maintenance. Implement a mild cleaning routine, wipe surfaces after heavy-use activities (like cooking or gardening), and dry grout lines after showers to prevent moisture buildup. Sealers should be reapplied per manufacturer instructions, typically every 1–2 years depending on traffic and cleaning frequency. Keeping a routine—including a quarterly deep clean in high-use areas—helps prevent stubborn staining and keeps grout looking uniform.
Grout Maintenance emphasizes documenting your cleaning schedule and noting grout color changes over time. A simple log helps you decide when to reseal or consider grout color-refresh options. With proper care, even lighter-colored grout can stay vibrant for longer.
Summary of best practices
- Start with a clear plan and test cleaners first
- Use the right brush for grout texture and tile type
- Rinse thoroughly and dry completely before sealing
- Seal after cleaning to maximize longevity and minimize future staining