Which Grout Is Smooth? A Practical Guide to Texture Choices
Discover which grout is smooth and why. Compare unsanded, cement-based sanded, and epoxy options, with practical installation tips, sealing guidance, and maintenance for a flawless joint finish.

Understanding which grout is smooth
Texture is the key concept when people ask which grout is smooth. In tile work, smooth refers to how even the surface of the joint appears and feels, not merely the color or shine. The difference between a truly smooth joint and a merely clean joint is often subtle, yet it matters for cleaning, water resistance, and long-term performance. According to Grout Maintenance, texture is influenced by three factors: grout formulation, joint width, and installation technique. A decision about which grout is smooth should start from the joint size and tile type rather than chasing a generic label. For many homeowners, the most practical rule of thumb is to favor unsanded grout for joints under 2 mm and epoxy grout for areas where texture quality must be maintained under heavy use. As you evaluate your project, consider where the smooth look will be most visible—backsplashes, shower niches, or floor transitions—and tailor your choice accordingly. The goal is a consistent line that stays smooth through cleaning and daily wear.
Key grout types and their texture outcomes
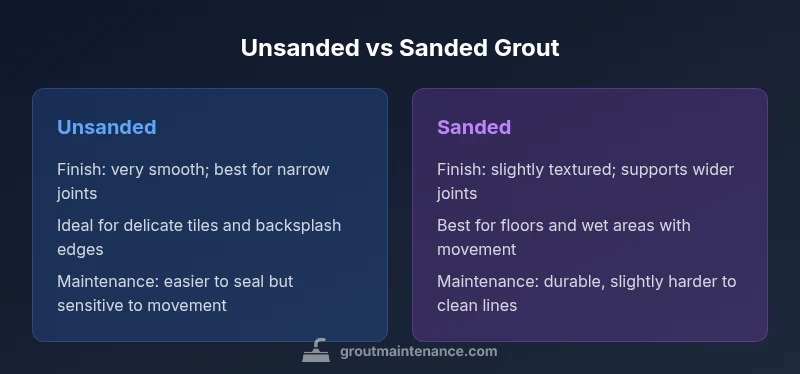
The main grout families—unsanded, sanded (cement-based), and epoxy—each produce a distinct texture outcome. Unsanded grout is designed for narrow joints and delicate tile surfaces where clamping or sanding could scratch the edges. It tends to feel the smoothest to the touch and provides a near-flawless visual line in narrow corridors or backsplashes. Sanded grout contains added aggregate, which creates a slight texture intended to resist cracking in wider joints. This texture can reduce the ultra-smooth appearance but offers strong durability in high-traffic areas. Epoxy grout is a resin-based alternative that cures to a very smooth, non-porous surface that resists staining and moisture. It’s often chosen for showers and kitchens where cleaning frequency is high. Cement-based grouts can be either unsanded or sanded, and there are variants designed specifically to optimize surface texture. In practice, the best choice balances joint width, tile material, and maintenance expectations.
Factors that affect texture beyond the product
Texture is not determined by the formula alone. Joint width is critical: very narrow joints tend to look and feel smoother, while wider joints show more surface texture. Tile material also matters; glazed ceramic and porcelain behave differently under compression. Movement and substrate flexibility influence how a grout joint wears over time; rooms with heavy traffic or seasonal expansion require grouts with better crack resistance. Application technique matters as well: overworking the grout or using too much water can pull the texture into a less uniform finish. Grout Maintenance’s analysis emphasizes that a smooth appearance is a result of harmonizing material choice with installation methods and environmental factors. Finally, curing conditions—temperature and humidity—affect how the final surface sets. A small test area can help you gauge whether your chosen grout will finish smoothly in your specific space.
Per-installation considerations for a smooth finish
Before mixing a batch, assess the tile type, joint dimensions, and substrate. For smooth joints, avoid oversized trowels that can overwork the fill and create ridges. Use a grout float at a shallow angle to compact the material without dragging in excess. Clean excess grout promptly to prevent smearing that ruins the surface. When applying, keep joints consistently full but not overflowing, which helps the texture remain even across the surface. In moisture-prone areas, pay attention to pot life and curing times; epoxy grout requires careful timing, while cement-based products demand a clean, dust-free environment. For vertical installations, work small sections at a time and check the edge alignment frequently. A well-prepared setup reduces the risk of trowel marks that would otherwise ruin a smooth finish and forces you to correct later rather than earlier.
Maintenance, sealing, and long-term smoothness
Smooth grout can still darken or stain if not cared for properly. Sealants and penetrants must be chosen based on grout type; epoxy grout typically does not require sealing, while unsanded and sanded cement-based grouts benefit from a quality sealer. Regular cleaning with pH-neutral cleaners helps preserve the line; avoid acidic or abrasive products that can erode or dull the surface. If your joints begin to show hairline cracks or micro-scratches, address them early with color-matched epoxy or a regrout. Over time, routine resealing (for cement-based products) can restore the appearance and smoothness. When you aim for a consistently smooth look, plan for periodic maintenance intervals rather than waiting for visible wear. The key is balancing daily cleaning routines with a proactive re-sealing or regrouting plan depending on usage and moisture levels.
Which grout is smooth for different tile types
Certain tile families respond differently to grout texture. Ceramic and porcelain tiles with flat backs pair well with unsanded grout; they allow fine lines that read as continuous across a wall or backsplash. Glass tile surfaces shine with a smooth epoxy grout that resists staining and is easy to wipe. Natural stone tiles introduce mineral deposits and require careful sealing; epoxy can be too slick in some stone layouts, so a cement-based unsanded option with a proper seal may yield the best look while preserving joint integrity. Large-format tiles with small joints benefit from smooth cement-based grouts if the movement is minimal, while more dynamic layouts may demand epoxy’s stiffness and low porosity. In short, tile type guides the texture outcome, and the joint size should align with that decision to maintain a smooth, easy-to-clean surface.
Application tips to maximize smoothness
To achieve a consistently smooth joint, start with clean, dry joints and a well-prepared surface. Use a high-quality, non-sanded grout in the appropriate width. Mix per manufacturer directions, then work the grout into the joints with a blade or narrow float at a slight angle to minimize air pockets. Wipe with a damp sponge in a single direction to avoid dragging excess material across the surface. For epoxy grout, work in small sections and use latex gloves to protect skin; evaporation rates can affect the cure texture. After initial set, avoid foot traffic and cleaning until fully cured. A final misting spray can help release surface haze in cement-based grouts; sealers should be applied after curing if required. With careful technique, you’ll maximize the chances of a uniformly smooth, professional-looking grout line.
Common pitfalls when seeking a smooth grout finish
Overworking the grout can pull out too much moisture and cause color and texture inconsistencies. Using the wrong trowel size or over-wetting the sponge can create ridges and smear. Under-sealing or no sealing, where appropriate, invites staining and wash-off that makes the joints look dull or rough. Rushing the cure can also lead to micro-cracks that degrade smoothness over time, especially in climates with rapid drying. Visibility of joints is strongly affected by lighting; a glare on a glossy tile may exaggerate tiny imperfections. Finally, selecting a grout type without considering tile movement or surface rotation reduces long-term smoothness and increases the likelihood of maintenance calls.
Real-world scenarios and recommended approaches
In a kitchen backsplash with glass tiles and 2 mm joints, unsanded grout often yields the smoothest line while being easy to seal and wipe. For a shower niche with natural stone and movement, a cement-based grout with a dense sealer may deliver a balance of smooth appearance and durability. In a bathroom floor with ceramic tile and more forgiving substrate, epoxy grout can provide a premium, high-durability finish with an exceptionally smooth feel. For exterior tile bands or areas subject to temperature swings, consider cement-based grout with movement-appropriate additives to reduce micro-cracking while preserving texture. Remember, the goal is a joint that remains smooth even after routine cleaning and foot traffic, so test a small area first and adjust technique and product choice accordingly.
Quick-start guide: a 5-step weekend plan
- Inspect joints: measure and note tile type. 2) Choose a grout family based on joint width and room conditions. 3) Prep surface: clean, dry, and dust-free. 4) Mix and apply using proper technique; avoid overworking. 5) Clean, cure, and seal (if required) according to manufacturer directions. This simple plan helps you achieve a smooth grout finish without trial-and-error guesswork. If you want the smoothest look, start with unsanded for narrow joints and reserve epoxy for moisture-prone spaces. Always test a small area before full installation to prevent costly mistakes.