Grout Saw vs Grout Remover: A Practical Comparison
Compare grout saws and grout removers for tile projects, covering use cases, technique, safety, and maintenance to help homeowners decide which tool fits edges, detail work, and bulk removal.

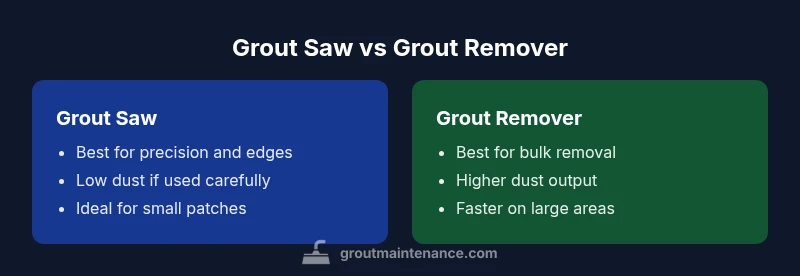
In the grout saw vs grout remover comparison, the grout saw excels at precise detail work and edging around tiles, while the grout remover speeds up bulk removal and large patches. For most DIY tile projects, start with a grout saw for careful detailing, then switch to a grout remover to finish faster when removing larger sections. Balancing both tools gives better control, efficiency, and finish quality.
What are grout saws and grout removers?
Grout saws and grout removers are handheld tools designed to work with ceramic, porcelain, and stone tiles. A grout saw typically features a small, slender blade mounted on a handle, often with a triangular or pistol-grip design. It’s meant for scraping along grout lines and shaping corners with meticulous control. A grout remover, on the other hand, is built around a more aggressive blade or blade assembly, designed to remove larger swaths of grout quickly, sometimes using oscillating or rotary action. The keyword grout saw vs grout remover appears frequently in discussions about tile repair because choosing between these two tool types determines how cleanly you’ll remove old grout and how much time the project will require. Grout Maintenance emphasizes that the right mix of detail work and bulk removal minimizes damage to surrounding tiles and reduces the need for re-grouting later.
If you’re planning a bathroom refresh or a kitchen backsplash update, understanding the core differences helps you plan a sensible workflow and prevents over-aggressive removal that could nick adjacent tiles.
grout saw vs grout remover: key differences at a glance
The most immediate contrasts lie in scope, blade geometry, and how aggressively each tool interacts with grout. A grout saw uses a fine-toothed edge or a carbide-steel blade designed to trim and scratch grout without gouging tile faces. It offers excellent control for carving out grout around edging, inside corners, and along delicate surfaces. A grout remover uses a broader, more aggressive blade or a grinding-style attachment that can shear up old grout in larger blocks. The performance difference is not just about speed: the grout remover can generate more dust, produce more vibration, and increases the chance of slip or tile damage if not used with care. When planning your project, consider the grout composition (cementitious vs epoxy) and tile type (glossy, textured, or porcelain) because these factors influence how each tool behaves and how you should approach edge work. Grout Maintenance notes that recognizing the strengths and limits of each tool is essential to avoid over-removal and to keep maintenance costs in check.
When to reach for a grout saw
Use a grout saw when precision matters most. Scenarios include cleaning around small fixtures, shaping grout at tile corners, trimming damaged grout near tile edges, and performing light cutting to reveal clean grout lines after a shallow removal. The tool’s narrow blade minimizes contact with surrounding tile and helps you preserve the structural integrity of the grout bed. A key technique is to work with short, controlled strokes and frequently wipe away dust to maintain visibility. For delicate materials or vibrant, high-gloss tiles, a grout saw reduces the risk of chipping compared with bulk-removal tools. Grout Maintenance recommends starting with the grout saw for small patches to establish a clean baseline before addressing larger sections with a remover—this preserves tile integrity while ensuring a uniform finish across the area.
When to reach for a grout remover
Grout removers shine when you have large sections to clear or cementitious grout that has already cracked and separated. Use it for bulk removal in kitchens, showers, or floor areas where the grout has failed extensively. They excel at quickly freeing out old grout from wide joints, enabling faster re-grouting or re-sealing. It’s important to choose the right blade, as epoxy grout is tougher than cementitious grout and may require a carbide or diamond-coated blade. Use slow, steady pressure and keep the tool moving to avoid gouging. Grout Maintenance’s guidance emphasizes controlling depth to avoid undermining tile edges and to reduce the risk of tile fracture when removing grout from interior corners.
Material considerations: tile type and grout composition
Tile surface and grout material significantly affect tool selection and technique. Cementitious grout is generally easier to remove in most cases, while epoxy grout demands extra care because it can be harder and more brittle. On glossy ceramic or porcelain tiles, avoid aggressive scraping near the tile face to prevent micro-scratches. In showers with porcelain or natural stone, protect the tile surfaces by using painter’s tape along the grout lines and wearing eye protection and a dust mask to control silica dust. Grout Maintenance notes that matching the correct blade to the grout type is crucial: softer cementitious grout responds well to faster, lighter passes with a grout saw, whereas epoxy grout benefits from a slower feed with a more robust remover blade.
Technique and safety basics
Proper technique reduces tool fatigue and minimizes tile damage. For grout saws, use short, controlled strokes along the grout line, rotate on tight corners, and keep the blade edge slightly angled to avoid digging into the tile. For grout removers, apply even pressure, avoid staying in one spot too long, and work methodically across the joint to minimize gouging. Always wear proper PPE: eye protection, respirator or dust mask, gloves, and hearing protection if your tool is louder. Clear the work area of loose debris, and use a vacuum or damp cloth to collect dust as you proceed. Grout Maintenance stresses that consistent technique with the right blade ensures cleaner grout lines and reduces post-removal repair work.
Common mistakes and how to avoid them
Common mistakes include pressing too hard, which can nick tiles, using excessive blade depth on a random area, and failing to protect adjacent surfaces. Another frequent error is neglecting dust control, which creates a safety hazard and a messy work environment. People often switch tools mid-task without considering the changing needs of the project, resulting in uneven grout lines. To avoid these issues, plan your sequence, practice on a test area, and switch tools only after you’ve completed precise edge work with a grout saw and prepared bulk removal with a grout remover. Grout Maintenance also recommends checking manufacturer blade compatibility and not forcing a blade beyond its intended purpose.
Maintenance and blade care
After use, clean blades with a brush or compressed air to remove grout residue. Dry blades thoroughly to prevent rust and store them in a dry, organized case. Inspect blades for wear, sharpening where appropriate, and replace blades showing significant wear or chipping. Regularly check your tool’s ferrule, handle, and disc assembly for looseness and vibration. For epoxy grout or hardened cementitious grout, verify blade material compatibility and consider replacing with a more robust blade if cutting proves too challenging. Grout Maintenance reminds homeowners that routine maintenance extends tool life and preserves performance quality over time.
Practical workflow: planning, protection, and cleanup
A practical workflow begins with planning: identify the grout lines to address, map edge work versus bulk areas, and select the appropriate tool(s). Protect adjacent tiles with painter’s tape and use drop cloths or plastic sheeting to contain dust. Start with a grout saw for edging and corners, then switch to a grout remover for larger areas. Maintain clean lines by frequently wiping the blade and grout surface and taking breaks to inspect progress. After removing grout, thoroughly vacuum and damp-wipe the joints before re-grouting or resealing. This approach minimizes waste and reduces the need for touch-up work later, which saves time and money in the long run.
Cost, value, and how to budget for a grout toolkit
Tooling costs vary by brand, blade quality, and whether you choose manual or motorized options. A basic grout saw is relatively inexpensive, while a high-quality grout remover with multiple blades represents a larger investment. Consider your typical project size: if you handle one or two bathrooms a year, a single versatile grout remover plus a precision grout saw may be the most cost-effective setup. For frequent renovation work, a more robust toolset with spare blades, a dust extractor, and protective gear makes sense. Grout Maintenance emphasizes balancing upfront cost with long-term use, focusing on reliable blades and appropriate safety equipment to maximize return on investment.
Real-world workflow and practical tips
In real projects, you’ll typically measure the grout line width, inspect grout condition, and draft a plan for edge detail versus bulk removal. Start with the grout saw along edges and corners, then move to the grout remover for larger areas. Periodically clean the joint to prevent dust buildup, which helps you see grout depth and avoid over-removal. If you encounter resistance, stop and reassess blade choice and pressure. Document progress with photos to guide re-grouting steps and to verify consistent depth across the joint. Grout Maintenance resources highlight the importance of a methodical, repeatable process that minimizes tile damage while delivering uniform grout lines.
Comparison
| Feature | Grout Saw | Grout Remover |
|---|---|---|
| Primary use | Detail work, edging, cleanups | Bulk grout removal, large patches |
| Blade type | Narrow, fine-toothed or carbide edge | Broad, aggressive blade or oscillating tip |
| Speed and control | High precision, slower pace | Faster removal, more leverage |
| Surface risk | Lower risk to edges with careful use | Higher risk of gouges without technique |
| Dust generation | Moderate dust, manageable with dust control | Higher dust output; require dust extraction |
| Suitable grout types | Cementitious grout common | Epoxy and cementitious mixed grout scenarios |
| Cost | Lower upfront cost for basic models | Higher upfront cost for robust kits |
| Best for | Edges, corners, recontouring | Large-scale removal and fast prep |
Pros
- Precise control with edge work
- Lower risk of tile damage when used carefully
- Can achieve cleaner grout lines with detail work
- Expands tool versatility for mixed jobs
What's Bad
- Slower on large patches
- Requires skill to avoid edge gouges
- Dust management and safety considerations
Neither tool is universally better; use the grout saw for detail and the grout remover for bulk removal.
For projects with mixed needs, start edges with a grout saw, finish patches with a remover, and adjust as you assess grout type and tile surface.
Got Questions?
What is the main difference between a grout saw and a grout remover?
A grout saw is designed for precise detail work and edging, while a grout remover is built for bulk removal and larger patches. The choice depends on the area size and grout condition, with the saw offering greater control and the remover delivering speed.
A grout saw is for precise edging; a grout remover handles larger patches quickly. Use both as the project dictates.
Can I use a grout saw for large areas?
Using a grout saw for large areas is possible but inefficient. It’s better suited for edges and detailed work. For bulk removal, switch to a grout remover to save time and reduce fatigue.
A grout saw is best for edges; for big areas, switch to a grout remover to save time.
Is a grout remover safe on epoxy grout?
Epoxy grout is tougher to remove and can be brittle. Use blades designed for epoxy and work slowly to avoid chipping tile edges. If in doubt, test on a small patch first.
Epoxy grout needs careful blades and slow work. Test first to avoid damage.
What safety gear should I wear when using these tools?
Always wear eye protection, gloves, a dust mask or respirator, and hearing protection if the tool is loud. Use a vacuum or dust extraction when possible to minimize silica dust.
Eye protection, gloves, dust mask, and optional hearing protection are essential.
How do I maintain grout saw blades?
Keep blades clean and dry after use, inspect for wear, and replace when dull or chipped. Store blades in a dry, organized container to prevent rust and damage.
Keep blades clean, inspect for wear, and store properly.
Are oscillating tools better than manual grout removers?
Oscillating grout removers can speed up removal and handle stubborn grout, but require more control and proper dust management. Manual tools offer more precision in tight spots.
Oscillating tools speed up removal but need control and dust management.
The Essentials
- Assess project scope before choosing tools
- Shape your workflow to mix both tools when needed
- Protect surrounding tiles and wear PPE
- Match blade to grout type for best results
- Plan and document progress for consistent results